Monday, October 2, 2017

How to install MongoDb on Ubuntu 16.04

1) Initially import the public key used by the package:

sudo apt-key adv --keyserver hkp://keyserver.ubuntu.com:80 --recv EA312927

2) Then create a list file using the command appropriate for your version of Ubuntu:

echo "deb http://repo.mongodb.org/apt/ubuntu xenial/mongodb-org/3.2 multiverse" | sudo tee /etc/apt/sources.list.d/mongodb-org-3.2.list

3) Once you're done with the above command reload the local package database:

sudo apt-get update

4) Creating the systemd service file for mongodb:

[Unit]
Description=High-performance, schema-free document-oriented database
After=network.target
Documentation=https://docs.mongodb.org/manual

[Service]
User=mongodb
Group=mongodb
ExecStart=/usr/bin/mongod --quiet --config /etc/mongod.conf

[Install]
WantedBy=multi-user.target

5) Once you have successfully come across all the above steps, start the daemon service:

sudo service mongod start

6) Check whether the service has started successfully from the mongodb logs. These logs would normally be stored in "var/log/mongodb". You should be able to see the following line, if there aren't any errors:

[initandlisten] waiting for connections on port <port>

In the above, port resembles the listening port.

7) Stopping the service:

sudo service mongod stop

8) Restarting the service:

sudo service mongod restart


Friday, February 27, 2015

Wait and Pulse Method in C# Threading


Wait and Pulse Method in C# Threading

Introduction

The monitor class have two static method Wait() and Pulse(). The purpose of Wait and Pulse is to provide a simple signaling mechanism: Wait blocks until it receives notification from another thread; Pulse provides that notification.


Wait must execute before Pulse in order for the signal to work. If Pulse executes first, its pulse is lost, and the late waiter must wait for a fresh pulse, or remain forever blocked. This differs from the behavior of an AutoResetEvent, where its Set method has a "latching" effect and so is effective if called before WaitOne.

One must specify a synchronizing object when calling Wait or Pulse. If two threads use the same object, then they are able to signal each other. The synchronizing object must be locked prior to calling Wait or Pulse.

When a thread is temporarily blocked from running, it calls Wait() This causes the thread to go to sleep and the lock for that object to be released, allowing another thread to use the object. At a later point, the sleeping thread is awakened when some other thread enters the same lock and calls Pulse() or PulseAll(). A call to Pulse() resumes the first thread in the queue of threads waiting for the lock. A call to PulseAll signals the release of the lock to all waiting threads.


Here are two commonly used forms of Wait():

public static bool Wait(object waitObject)
public static bool Wait(object waitObject, int milliseconds)

The first form waits until notified. The second form waits until notified or until the specified period of milliseconds has expired. For both waitObject specifies the object upon which to wait.

Here are the general forms for Pulse() and PulseAll():
public static void Pulse(object waitObject)
public static void PulseAll(object waitObject)

Here, waitObject is the object being released.
To understand the need for and the application of Wait() and Pulse() we create following program

using System;
using System.Threading;
namespace WaitndPulesMethod
{
class PingPong
    {
        public void ping(bool running)
        {
            lock (this)
            {
                if (!running)
                {
                    //ball halts.
                    Monitor.Pulse(this); // notify any waiting threads
                    return;
                }
                Console.Write("Ping ");
                Monitor.Pulse(this); // let pong() run
                Monitor.Wait(this); // wait for pong() to complete
            }
        }
        public void pong(bool running)
        {
            lock (this)
            {
                if (!running)
                {
                    //ball halts.
                    Monitor.Pulse(this); // notify any waiting threads
                    return;
                }
                Console.WriteLine("Pong ");
                Monitor.Pulse(this); // let ping() run
                Monitor.Wait(this); // wait for ping() to complete
            }
        }
    }
    class MyThread
    {
        public Thread thread;
        PingPong pingpongObject;
        //construct a new thread.
        public MyThread(string name, PingPong pp)
        {
            thread = new Thread(new ThreadStart(this.run));
            pingpongObject = pp;
            thread.Name = name;
            thread.Start();
        }
        //Begin execution of new thread.
        void run()
        {
            if (thread.Name == "Ping")
            {
                for (int i = 0; i < 5; i++)
                    pingpongObject.ping(true);
                pingpongObject.ping(false);
            }
            else
            {
                for (int i = 0; i < 5; i++)
                    pingpongObject.pong(true);
                pingpongObject.pong(false);
            }
        }
    }
    class BouncingBall
    {
        public static void Main()
        {
            PingPong pp = new PingPong();
            Console.WriteLine("The Ball is dropped... \n");
            MyThread mythread1 = new MyThread("Ping", pp);
            MyThread mythread2 = new MyThread("Pong", pp); 
            mythread1.thread.Join();
            mythread2.thread.Join();
            Console.WriteLine("\nThe Ball Stops Bouncing.");
            Console.Read();
        }
    }
}

Saturday, February 21, 2015

Uploading a file to Azure Blob Storage using C#


So I'm in the process of upgrading my blog to be able to upload pictures to the Azure Blob Storage.
Most of the samples I found required alot of XML configuration, or special project types. This post offers a simpler way, that will get you started.
  1. First, you need the NuGet Package "WindowsAzure.Storage".
  2. After that, then ensure that you have a storage account on Azure, and that you created a public container.
  3. Find you account name and primary access key (There is a icon called manage keys at the bottom of the screen of the mangement portal)
  4. Take the code snippet below and add your values (remember to edit the file path to a file that exists):
 
 var credentials = new StorageCredentials("deldysoft", "YOUR PRIMARY KEY FROM. GET IT FROM THE MANGEMENT PORTAL");

var client = new CloudBlobClient(new Uri("http://deldysoft.blob.core.windows.net/"), credentials);

// Retrieve a reference to a container. (You need to create one using the mangement portal, or call container.CreateIfNotExists())
var container = client.GetContainerReference("deldydk");

// Retrieve reference to a blob named "myfile.gif".
var blockBlob = container.GetBlockBlobReference("myfile.gif");

// Create or overwrite the "myblob" blob with contents from a local file.
using (var fileStream = System.IO.File.OpenRead(@"C:\\myfile.gif"))
{
  blockBlob.UploadFromStream(fileStream);
}


Image result for azure logo
 

Thats it! You should now be able to see your blob at the mangement portal.
If you need to list blobs, and other stuff that is porsible, then look at other tutorials on the web or at the Azure Website. You should be able to use the client you created here to skip over all the configuration stuff that many of them include.
Have fun!
 

Sunday, February 15, 2015

Running Hadoop on Cygwin in Windows


In this document you are going to see how you can setup pseudo-distributed, single-node Hadoop (any stable version 1.0.X) cluster backed by the Hadoop Distributed File System, running on windows. Run your Hadoop cluster through 10 steps
 
Pre-requisite
Software’s to be downloaded before you start these procedures. You can download all the recommended software’s before you get started with the steps listed below
 
 
Single-node Hadoop cluster step by step instruction
 
1. Installing Cygwin
a) Cygwin comes with a normal setup.exe to install in Windows, but there are a few steps you need to pay attention, I would like to walk you through the step by step installation. Click her to download Cygwin setup
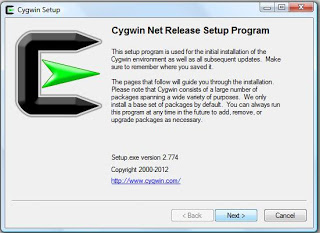
b)Once you start installing the first screen which appears this
SSH Installation
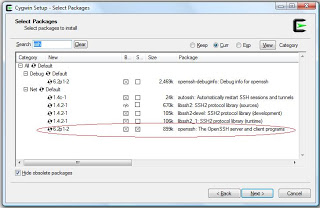
c) After 4 steps from the above screen you will be getting a screen to select packages, in this step you can choose OpenSSH installation along with Cygwin
 
d)  Cygwin installer proceeds with including all dependent packages which are required for the installation.

Now you installed Cygwin with OpenSSH2. Set Environment Variable in Window
a)  Find “My Computer” icon either on the desktop, right-click on it and select Properties item from the menu.
b) When you see the Properties dialog box, click on the Environment Variables button which you see under the Advance Tab.
c) When you click Environment Variables dialog shows up, click on the Path variable located in the System Variables box and then click the Edit button.
d) Edit dialog appears append you cygwin path end of the Variable value field
             (I installed Cygwin under C: drive  – c:\cygwin\bin;)

Now you are down with Cygwin environmental setup


3. Setup SSH daemona) Open the Cygwin command prompt.
b) Execute the following command:
                    $ ssh-host-config
 
c)       When asked if privilege separation should be used, answer no.
 
d)       When asked if sshd should be installed as a service, answer yes.
(If it prompts with CYGWIN environment variable, enter ntsec)

4. Start SSH daemon

a) Find My Computer icon either on your desktop, right-click on it and select Manage from the context menu.

b) Open Services and Applications in the left-hand panel then select the Servicesitem.

c) Find the CYGWIN sshd item in the main section and right-click on it.

d) On the property popup you can select “Start up :” Automatic. So that it will start up when windows starts
 
 
5.      Setup authorization keys
a)       Open Cygwin Terminal and exectute the command
             $ ssh-keygen
(Since we are generating keys without password, so press enter. Below is the sequence of text which appears in the terminal prompt)
b)      Once the command completed generating the key
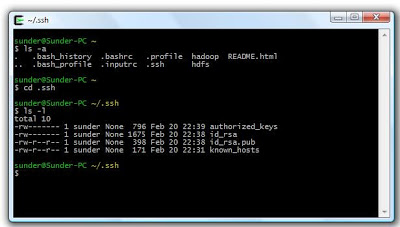
             $ cd ~/.ssh
(.ssh folder will be under $ <user> directory, eg:- please find he screen shot below .ssh is under my user profile installed in my system is “sunder”)

 
c)   Next step is to create an RSA key pair with an empty password. You have to enable SSH access to your local machine with this newly created key.
                $ cat id_rsa.pub >> authorized_keys
 
Now you created RSA key pair
 
To test SSH installed, from a terminal prompt enter:
                                    $ ssh localhost
( You will get a similar notification in the terminal)
 
1
$ ssh localhost
2
Last login: Mon Apr  8 21:36:45 2013 from shankar-pc
 
Now you SSH successfully running with keys generated


6.       JAVA Installation
a)       Installing JAVA in windows system is a easy step up step process
b)       You can download .exe for Windows installation file from the Oracle JDK download page
c)      Choose your JAVA installation folder (eg :- C:\Java\jdk1.6.0_41) and install JAVA
Now you successfully installed JAVA
 
7.       Setting JAVA_HOME in Windows
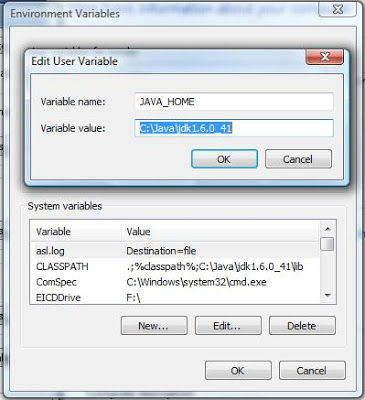
a)       Set environmental variable for JAVA_HOME, as we already did for Cygwin in the above instruction – the same steps to be followed for setting JAVA_HOME
b)       You may need to create a new variable under the User Variable / System Variable. Please find the reference screen shot below

 
8.    Setting JAVA_HOME in Cygwin
  a. To set JAVA_HOME in Cgwin have to update Java home directory in /etc/bash.bashrc
 
 b. edit $HOME/.bashrc file to set JAVA home directory
 
                         $ vi bashrc
 
c. Set Java home, you can see export JAVA_HOME line in the file been commented using #. Remove # (uncomment it) and you have to key in by giving your Java installed path 
 
 d. export JAVA_HOME= c:\\java\\jdk1.6.0_41
 
(to recognize your windows folder you have give 2 backward slash”\\” for each folder, since I installed java under  c:\java\jdk1.6.0_41 in my windows path) 
 
 
Please Note:
 Since you are using Windows you can also edit file through windows explorer whenever you are editing any files inside Cgwin through Windows either with notepad or wordpad, after saving the files in windows ensure you get into Cgywinterminal and locate the file and execute a UNIX command  “$ dos2unix <filename>”. This is more important in all stages of execution
 
e. Exit any terminal and open a new terminal
f. To check the variable is set, type the command in a terminal
                       $ echo $JAVA_HOME
(The above command will display the java directory path you se or you can also type $ java –version or simply $ java to see execution of java commands in the terminal )
 
Now you set environment variable in Cygwin ie. JAVA_HOME
 
 
9.       Hadoop Installation
Below step by step instruction will help you to setup a single-node Hadoop cluster. Before we move on know about the HDFS (Hadoop Distributed File System) Architecture Guide
 
a) Download a recent stable release from one of the Apache Download Mirrors.
b) Download “hadoop-<version>.tar.gz” to your desired directory
c)    From the terminal type this command where you download your hadoop-< version>.tar.gz file
$ tar -xvf hadoop-<version>.tar.gz
d)  The above command will extract the hadoop files and folder
e)  Once you extracted all the files, you may have to edit few configuration files inside  <Hadoop Home> directory
Feel free to edit any file through windows with wordpad but don’t forget to execute the UNIX command “$ dos2unix <filename>” for all the files you open up in windows.
f)   Now edit <Hadoop Home>/conf/hadoop-env.sh to set Java home as you did it before for environmental variable setup
(Since I already set my JAVA_HOME in .bashrc so I gave JAVA_HOME=$JAVA_HOME)
 
g)   And then update <Hadoop Home>/conf/core-site.xml. with the below xml tag to setup hadoop file system property
<configuration>
<property>
<name>fs.default.name</name>
  <value>hdfs://localhost:50000</value>
</property>
</configuration>
h)    Now update<Hadoop Home>/conf/ mapred -site.xml with the below xml tag
<configuration>
<property>
<name>mapred.job.tracker</name>
  <value>localhost:50001</value>
</property>
</configuration>
i)    Now update<Hadoop Home>/conf/ hdfs -site.xml with the below xml tag
<configuration>
<property>
<name>dfs.data.dir</name>
<value>/home/<user>/hadoop-dir/datadir</value>
</property>
<property>
<name>dfs.name.dir</name>
<value>/home/<user>/hadoop-dir/namedir</value>
</property>
</configuration>
Assume you created your directory in your user profile, so user your user name after /home otherwise you can also check your folder by executing pwd command after you get into your terminal inside your created folder 
Assuming create “data” and “name” directory from your home directory, I created a directory hadoop-dir and inside that I have created 2 directories one for name node and other for data node
ensure your data and name directory created and accessed by hadoop, execute the command to change the directory permission  by
             $ chmod 755 data
as well as
 
             $ chmod 755 name
i.e.  if you $ ls -l your directory you data and name directory should be in this mode “drwxr-xr-x” which means owner has three permissions, and group and other have only read and execute permissions
 
10.   HDFS Format
Before starting your cluster you may need to format your HDFS by running the below command from <Hadoop-Home-Dir>/bin
$ ./hadoop namenode -format
 
11.  Copy File to HDFS
        To copy local file to HDFS execute this command from <Hadoop-Home-Dir>/bin  from the terminal
            $ ./hadoop dfs -copyFromLocal <localsrc> URI
Eg: – If I have a sample.txt file in the path /home/<user>/Example
 
Then I have to executing the command from<Hadoop-Home-Dir>/bin
             $ ./hadoop dfs –copyFromLocal /home/<user>/Example/sample.txt /
 This command will copy the local fin into HDFS home directory
 
12.   Browse HDFS through web interface
Starting hadoop cluster is by executing a command from <Hadoop-Home-Dir>/bin
            $ ./start-all.sh
This will startup a Namenode, Datanode, Jobtracker and a Tasktracker on your machine
 
To stop the cluster
            $ ./stop-all.sh
to stop all the daemons running on your machine.
 
To understand more on Getting Started With Hadoop
Browse the web interface for the NameNode and the JobTracker; by default they are available at:
 
NameNode – http://localhost:50070/
JobTracker – http://localhost:50030/


Uninstalling Cygwin

Here's the rough steps on how to do it, according to the official FAQ.
  1. Stop and remove any cygrunsrv services
  2. Stop all Cygwin processes and unmount any filesystem's mount with the mount command.
  3. Delete the Cygwin root folder and all subfolders.
  4. Delete the Cygwin shortcuts on the Desktop and Start Menu.
  5. Remove cygwin binary path from your Windows search path, and delete the CYGWIN system variable.
  6. Delete Software\Cygwin keys from registry.  

Removing SSHD service

To remove Cygwin sshd in the cleanest possible way:
  • cygrunsrv -E sshd
  • cygrunsrv -R sshd
  • Delete the folder c:\cygwin and all its sub-folders
  • Remove the Environment Variable 'CYGWIN'
  • Edit the Environment path accordingly
  • Start...Run... regedit and delete these two registry trees
  • "HKEY_CURRENT_USER_Software_Cygnus Solutions"
  • "HKEY_LOCAL_MACHINE_Software_Cygnus Solutions"
  • Go to Control Panel, Category View, Performance and Maintenance, Administrative Tools, Computer Management.or click Start...Run...compmgmt.msc delete the sshd user if it exists in the "System Tools" - "Local Users and Groups" - "Users" section.

Monday, February 9, 2015

Install and Enable Telnet in Windows 8 & 8.1 – Use The Telnet Client Utility

Telnet is one of the famous network protocol widely used to manage network and other equipment. If you are a system or network administrator, I’m sure that you know the importance of having telnet client utility on your Windows 8.1 or 8 computer. For some strange security reasons,Windows 8 or 8.1 did not come telnet client installed. By default you can’t use Windows 8 or 8.1 to connect other devices with telnet protocol. But you can enable this feature easily.  Here is a  simple guide about how to install and enable telnet in Windows 8 and 8.1.

By default if you search telnet in apps or type ’telnet’ in command prompt, it will return an error message as ’not recognized as an internal or external command’. Installing the telnet client from control panel in Windows 8.1 or 8 will solve this issue.
Installation medium such as CD/DVD, ISO or any other downloads are not required for this purpose, we can simply enable it from control panel.


To Enable Telnet in Windows 8 & Windows 8.1, Follow the Steps.

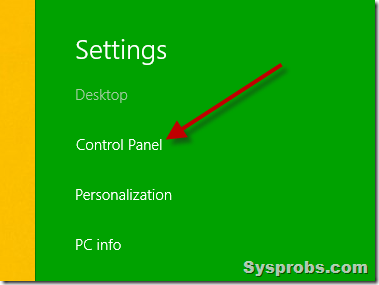
1) Access Control Panel from Windows charm bar or pressing Windows key + I   from desktop.


telnet in windows 8

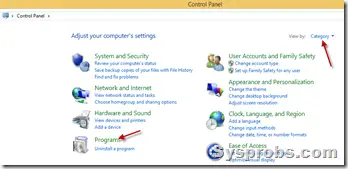
2) In ‘Category’ control panel view, click ‘Programs’.

click on programs

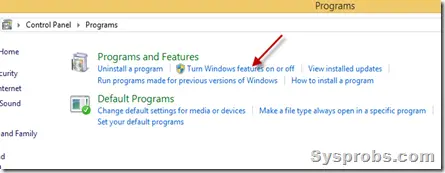
3) Click ‘Turn Windows features on or off’ in next screen as shown below.

turn on windows features


Recommended Reading

How to enable ping response in Windows 8
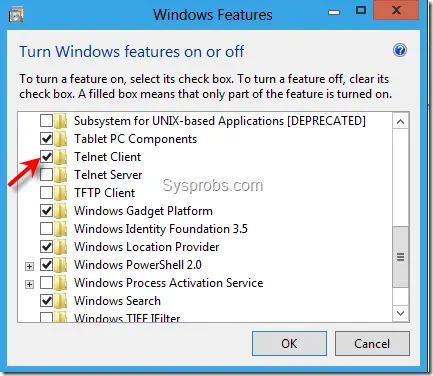
5) Earlier step will bring a dialog box where you can select extra features. Select  ‘Telnet Client’ by ticking the box. A small installation will run once you have pressed OK.

telnet in windows 8.1
That’s it, restarting PC not required here. You have successfully installed telnet on Windows 8 or 8.1.
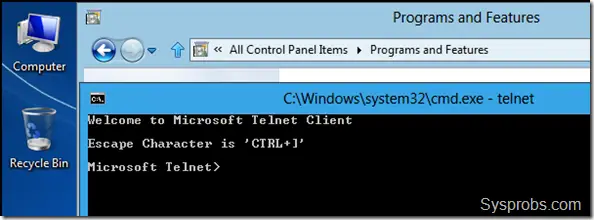
Now if you try telnet command in command prompt or search in Apps, you will get the correct telnet prompt as below.

working telnet in Windows 8

If you are a professional network admin, Windows telnet client utility will not be suitable for you. You can try some other professional telnet client utilities.
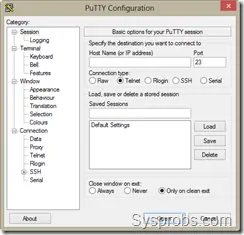
My favorite is, PuTYY which works fine on Windows 8.1 and 8.

putty


Thursday, January 8, 2015

The Beginner’s Guide to iptables

About iptables

iptables is a command-line firewall utility that uses policy chains to allow or block traffic. When a connection tries to establish itself on your system, iptables looks for a rule in its list to match it to. If it doesn’t find one, it resorts to the default action.
iptables almost always comes pre-installed on any Linux distribution. To update/install it, just retrieve the iptables package:
sudo apt-get install iptables
There are GUI alternatives to iptables like Firestarter, but iptables isn’t really that hard once you have a few commands down. You want to be extremely careful when configuring iptables rules, particularly if you’re SSH’d into a server, because one wrong command can permanently lock you out until it’s manually fixed at the physical machine.

Types of Chains

iptables uses three different chains: input, forward, and output.
Input – This chain is used to control the behavior for incoming connections. For example, if a user attempts to SSH into your PC/server, iptables will attempt to match the IP address and port to a rule in the input chain.
Forward – This chain is used for incoming connections that aren’t actually being delivered locally. Think of a router – data is always being sent to it but rarely actually destined for the router itself; the data is just forwarded to its target. Unless you’re doing some kind of routing, NATing, or something else on your system that requires forwarding, you won’t even use this chain.
There’s one sure-fire way to check whether or not your system uses/needs the forward chain.
iptables -L -v

The screenshot above is of a server that’s been running for a few weeks and has no restrictions on incoming or outgoing connections. As you can see, the input chain has processed 11GB of packets and the output chain has processed 17GB. The forward chain, on the other hand, has not needed to process a single packet. This is because the server isn’t doing any kind of forwarding or being used as a pass-through device.
Output – This chain is used for outgoing connections. For example, if you try to ping howtogeek.com, iptables will check its output chain to see what the rules are regarding ping and howtogeek.com before making a decision to allow or deny the connection attempt.
The caveat
Even though pinging an external host seems like something that would only need to traverse the output chain, keep in mind that to return the data, the input chain will be used as well. When using iptables to lock down your system, remember that a lot of protocols will require two-way communication, so both the input and output chains will need to be configured properly. SSH is a common protocol that people forget to allow on both chains.

Policy Chain Default Behavior

Before going in and configuring specific rules, you’ll want to decide what you want the default behavior of the three chains to be. In other words, what do you want iptables to do if the connection doesn’t match any existing rules?
To see what your policy chains are currently configured to do with unmatched traffic, run the iptables -L command.

As you can see, we also used the grep command to give us cleaner output. In that screenshot, our chains are currently figured to accept traffic.
More times than not, you’ll want your system to accept connections by default. Unless you’ve changed the policy chain rules previously, this setting should already be configured. Either way, here’s the command to accept connections by default:
iptables --policy INPUT ACCEPT
iptables --policy OUTPUT ACCEPT
iptables --policy FORWARD ACCEPT
By defaulting to the accept rule, you can then use iptables to deny specific IP addresses or port numbers, while continuing to accept all other connections. We’ll get to those commands in a minute.
If you would rather deny all connections and manually specify which ones you want to allow to connect, you should change the default policy of your chains to drop. Doing this would probably only be useful for servers that contain sensitive information and only ever have the same IP addresses connect to them.
iptables --policy INPUT DROP
iptables --policy OUTPUT DROP
iptables --policy FORWARD DROP

Connection-specific Responses

With your default chain policies configured, you can start adding rules to iptables so it knows what to do when it encounters a connection from or to a particular IP address or port. In this guide, we’re going to go over the three most basic and commonly used “responses”.
Accept – Allow the connection.
Drop – Drop the connection, act like it never happened. This is best if you don’t want the source to realize your system exists.
Reject – Don’t allow the connection, but send back an error. This is best if you don’t want a particular source to connect to your system, but you want them to know that your firewall blocked them.
The best way to show the difference between these three rules is to show what it looks like when a PC tries to ping a Linux machine with iptables configured for each one of these settings.
Allowing the connection:

Dropping the connection:

Rejecting the connection:

Allowing or Blocking Specific Connections

With your policy chains configured, you can now configure iptables to allow or block specific addresses, address ranges, and ports. In these examples, we’ll set the connections to DROP, but you can switch them to ACCEPT or REJECT, depending on your needs and how you configured your policy chains.
Note: In these examples, we’re going to use iptables -A to append rules to the existing chain. iptables starts at the top of its list and goes through each rule until it finds one that it matches. If you need to insert a rule above another, you can use iptables -I [chain] [number] to specify the number it should be in the list.
Connections from a single IP address
This example shows how to block all connections from the IP address 10.10.10.10.
iptables -A INPUT -s 10.10.10.10 -j DROP
Connections from a range of IP addresses
This example shows how to block all of the IP addresses in the 10.10.10.0/24 network range. You can use a netmask or standard slash notation to specify the range of IP addresses.
iptables -A INPUT -s 10.10.10.0/24 -j DROP
or
iptables -A INPUT -s 10.10.10.0/255.255.255.0 -j DROP
Connections to a specific port
This example shows how to block SSH connections from 10.10.10.10.
iptables -A INPUT -p tcp --dport ssh -s 10.10.10.10 -j DROP
You can replace “ssh” with any protocol or port number. The -p tcp part of the code tells iptables what kind of connection the protocol uses.  If you were blocking a protocol that uses UDP rather than TCP, then -p udp would be necessary instead.
This example shows how to block SSH connections from any IP address.
iptables -A INPUT -p tcp --dport ssh -j DROP

Connection States

As we mentioned earlier, a lot of protocols are going to require two-way communication. For example, if you want to allow SSH connections to your system, the input and output chains are going to need a rule added to them. But, what if you only want SSH coming into your system to be allowed? Won’t adding a rule to the output chain also allow outgoing SSH attempts?
That’s where connection states come in, which give you the capability you’d need to allow two way communication but only allow one way connections to be established. Take a look at this example, where SSH connections FROM 10.10.10.10 are permitted, but SSH connections TO 10.10.10.10 are not. However, the system is permitted to send back information over SSH as long as the session has already been established, which makes SSH communication possible between these two hosts.
iptables -A INPUT -p tcp --dport ssh -s 10.10.10.10 -m state --state NEW,ESTABLISHED -j ACCEPT
iptables -A OUTPUT -p tcp --sport 22 -d 10.10.10.10 -m state --state ESTABLISHED -j ACCEPT

Saving Changes

The changes that you make to your iptables rules will be scrapped the next time that the iptables service gets restarted unless you execute a command to save the changes.  This command can differ depending on your distribution:
Ubuntu:
sudo /sbin/iptables-save
Red Hat / CentOS:
/sbin/service iptables save
Or
/etc/init.d/iptables save

Other Commands

List the currently configured iptables rules:
iptables -L
Adding the -v option will give you packet and byte information, and adding -n will list everything numerically. In other words – hostnames, protocols, and networks are listed as numbers.
To clear all the currently configured rules, you can issue the flush command.
iptables -F