Tuesday, February 18, 2014

How to send automated emails with attachments from Windows Phone apps

Step1: Download the LiveMailMesage tool (note that it comes with a FREE trial) and add references to your Windows Phone application project.

Step2: Create a new LiveMailMesage object:
 
LiveMailMessage mailMessage = new LiveMailMessage();

Step3: Set a Live/Hotmail account needed to connect to Microsoft Live SMTP mail server:
 
 
mailMessage.MicrosoftAccountEmail = myMicrosoftAccountEmail ;
mailMessage.MicrosoftAccountPassword = myMicrosoftAccountPassword;

Step4: Set some mail data:


mailMessage.To = myTo;
mailMessage.Subject = mySubject;
mailMessage.Body = myBody; //accepts text or HTML

Step5:  Add some attachments (max attach limit size currently is 50MB) , note that you can also use different  resources or a IsolatedStorage path:


mailMessage.AddAttachment("\resources\file.jpg");
mailMessage.AddAttachment("\rex\file.wav");
mailMessage.AddAttachment("\myFolder\file.mp3");
mailMessage.AddAttachment("\downloads\file.mp4");
 
Step6: Set message event handlers (send operation is asyncronous and not UI blocking)


mailMessage.Error +=  mailMessage_Error;
mailMessage.MailSent += mailMessage_MailSent;
mailMessage.Progress += mailMessage_Progress;

Step7:  Send email (async, runs on a separated thread) :
 
mailMessage.SendMail();

Tuesday, February 11, 2014

Enable NuGet package restore in Visual Studio

Having a build process for each solution is very useful, but we can have some errors like these:
  • C:\Builds\[…]\.nuget\nuget.targets(76,9): error : Package restore is disabled by default. To give consent, open the Visual Studio Options dialog, click on Package Manager node and check ‘Allow NuGet to download missing packages during build.’ You can also give consent by setting the environment variable ‘EnableNuGetPackageRestore’ to ‘true’.
  • C:\Builds\[…]\.nuget\nuget.targets(76,9): error MSB3073: The command “”C:\Builds\[…]\.nuget\nuget.exe” install “C:\Builds\[…]\packages.config” -source “” -o “C:\Builds\[…]\packages”" exited with code 1.
We use NuGet in Visual Studio 2012 RC with TFS 2012 RC: we want to enable missing NuGet packages restoring and we would prefer to not check-in packages into source control. So, in Visual Studio Solution Explorer, right click on solution and click on “Enable NuGet Package Restore”:

Solution: Enable NuGet Package Restore

Do you want to configure this solution to download and restore missing NuGet packages during build? Yes, of course:
NuGet Package Manager: Enable NuGet Package Restore

A .nuget folder is added to the root of the solution.
NuGet Package Manager: finished configuring this solution to restore NuGet packages on build


Monday, February 10, 2014

I/O Device Error

What Are the Common I/O Device Error Messages?

Unfortunately, the I/O device error can generated more than one error message. Some of the most commonly encountered messages associated with the error include:
-          The request could not be performed because of an I/O device error
-          Only part of a readprocessmemory request was completed
-          Only part of a writeprocessmemory request was completed

Windows may display a “Windows error code” along with the plain language error message. The I/O device error codes that are associated with the error include: error 6, error 21, error 103, error 105, and error 131.

Why Does the I/O Device Error Occur?

There are a number of potential causes for I/O device errors on computers that run the Windows Operating System (OS). These include:
-          Outdated or corrupt driver installation for the affected hardware device.
-          Windows using an incompatible transfer mode for the hardware.
-          Faulty or loose connection with the hardware.
-          The portable media (CD, DVD, or SD card) is damaged or excessively dirty.

Basic I/O Device Error Troubleshooting

Before throwing away a “faulty” CD/DVD, or delving into more complex troubleshooting, there are some basic steps computer users can attempt to clear the I/O device error. If the steps do not solve the issue, they may help pinpoint what is causing the error to be thrown and save time in fixing the issue.

Step 1 – Restart the computer that is throwing the I/O device error.

Step 2 – Attempt to access the disk, drive, or portable media again.

Step 3 – If the error is still being thrown, try to access the disk on another computer (if available). This will help identify if the error is with the drive, IDE channel, or media (disk) itself.

Step 4 – If the disk/media opens on the alternative computer, there is an issue with the primary PC (drive, IDE, or connection). If it does not, there could be a problem with the media itself or IDE channel. If you do not have another computer available and the error is being thrown when attempting to read a CD/DVD or SD card, insert a different disk or card into the respective computer’s drive to see if it can be read. If it works, then the issue is with the disk/drive/device you are trying to use. If not, then it is with the IDE, drive, or connection on your primary computer.

How to Check Hardware Connections

Loose drive or hardware connections are a common cause of the I/O device error.

Step 1 – If the device throwing the error is an external hard drive, reseat the USB or fire wire connection to your computer.

Step 2 – If the error persists, connect the drive to an alternative USB port on the computer. If you are using a USB hub, connect the drive directly to one of the computer’s USB ports.

Step 3 – Obtain a replacement cable for the drive and reconnect to the computer.

Step 4 – Attempt to read or write to the drive or disk again. If the error continues to be thrown, the connection is not the likely cause of the problem. If you suspect the problem is with the internal hard drive on your computer, attempting to reconnect the drive is not recommended for the casual user as significant damage can result to the computer if the task is conducted improperly.

Change the IDE Channel Transfer Properties

Another cause of the I/O device error is that Windows has the transfer mode for the drive or device set incorrectly. The transfer mode can be changed or corrected by the end-user if logged in to the computer in administrator mode.

Step 1 – Select the “Start” menu button and then right click the “My Computer” icon.

Step 2 – Choose the “Manage” menu option on the subsequently displayed menu. Then, click or choose the “Device Manager” menu option located beneath the “Computer Management” window.

Step 3 – Select the menu icon to expand the “IDE ATA/ATAPI” controller display. There will be one or many listings for IDE ATA/ATAPI channels available on the computer.

Step 4 – Right click the channel that corresponds to the drive that is throwing the I/O device error. If you can’t determine which IDE channel is the appropriate one for the error being thrown on your computer choose the one labeled “Secondary IDE Channel.”

Step 5 – Select the “Properties” menu option followed by opening the “Advanced Settings” menu tab.

Step 6 – Choose the “PIO Only” menu option located in the “Transfer Mode” box. This will be the device corresponding for the drive throwing the error. On most computers, the correct option will be “Device 0.” Ensure you do not change the Primary IDE Channel Device 0 when manipulating the IDE properties since this is normally the system disk. Modifying the transfer mode for this disk can result in the Windows OS failing to work properly. On computers running the Windows 7 OS, uncheck the “Enable DMA” menu option to disable DMA. This is equivalent to the “PIO Only” setting on older versions of the Windows OS.

Step 7 – Select or click the “Ok” menu button and exit the configuration applications. On the Advanced Settings tab, select PIO Only in the Transfer Mode box for the device that represents the appropriate drive. Typically, this is Device 0. Then, click OK and exit all windows.

Step 8 – Restart your computer and test the drive or device that is throwing the I/O device error.

Step 9 – If the device or drive does not work after restart, then it may not be located under the secondary IDE channel device 0. If this is the case, change device 0’s transfer mode back to DMA, and repeat the process for the Primary IDE channel device 1 and then the Secondary IDE channel device 1 if the primary does not work (remembering not to change the Primary IDE channel device 0). After each change, restart the computer.

Verify the Status of the Device in Windows Device Manager

If changing the IDE channel device settings does not work, the drive status can be verified and troubleshoot via Windows Device Manager.

Step 1 – Select the “Start” menu and then click the “Control Panel” menu option.

Step 2 – Choose the “Performance and Maintenance” menu choice and then click the “System” menu option.

Step 3 – Choose the “Hardware” menu tab and open the “Device Manager.”

Step 4 – Locate the device that is throwing the I/O device error by expanding the menu items under the applicable category in the device manager.

Step 5 – If you note a red “X” on the menu icon located next to the device description, the hardware periphery has been disabled by the OS.

Step 6 – Open the “General” menu tab and select the “Enable Device” menu option located beneath the “Device Status” menu section.

Step 7 – Click the “Ok” menu button and follow the default menu prompts that follow. After the enabling device wizard exits, test the disk or drive that is throwing the error.

Step 8 – If the disk or drive does not work or continues to throw the same I/O error, select the “General” menu tab and click the “Troubleshoot” menu option found under the “Device Status” section.

Step 9 – Press the “Ok” menu button and follow the menu prompts. If there is still an error displayed, then the device driver likely requires updating.

Step 10 – Select the “Driver” menu tab. Then, click the “Update Driver” menu option and follow the default OS prompts.

Step 11 – Restart the computer and test the hardware throwing the I/O error.

Thursday, January 30, 2014

How to Launch the Application Details Page in Windows Phone Store using C#?

Below is a sample code snippet that demonstrates how to use the MarketplaceDetailTask. Modify the Content Identifier to specify the app for which the details page needs to be shown.

MarketplaceDetailTask task = new MarketplaceDetailTask();

task.ContentIdentifier = "<App ID>";

task.ContentType = MarketplaceContentType.Applications;

task.Show();

Wednesday, June 26, 2013

Download and Install AndroidSDK in Ubuntu 12.04 (Precise Pangolin)

Android SDK is a development environment for the Android mobile operating system which allows you to write applications for Android devices or gain elevated privileges on android devices with the help of third party software.
This brief tutorial is going to show you how to download and install it in Ubuntu 12.04 if you haven’t already done so. To install it, you first need to install Java JDK package or use the openJDK Java alternative that comes with Ubuntu.
In this tutorial, I’m going to be using the openJDK version of Java. To install Oracle Java version, then read this post first.
Objectives:
  • Install AndroidSDK in Ubuntu 12.04 (Precise Pangolin)
  • Enjoy!

To get started, press Ctrl – Alt – T on your keyboard to open the terminal. When it opens, run the commands below to install OpenJDK.
sudo apt-get install openjdk-6-jre openjdk-6-jdk icedtea6-plugin

Next, download AndroidSDK package by running the commands below. At the time of this writing, the current version was r20. Or click this link to download the .tgz archive file.
wget http://dl.google.com/android/android-sdk_r20-linux.tgz

After downloading, run the commands below to extract the downloaded file.
tar -xvzf android-sdk_r20-linux.tgz

After extracting the package, run the command below to change into the tools directory.
cd ~/android-sdk-linux/tools

Finally, run the commands below to begin the installation.
./android
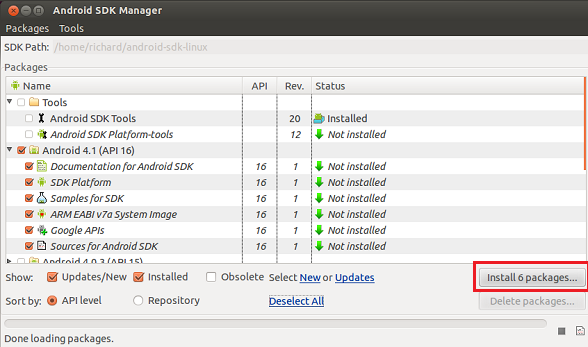
 Install Android updates if there are any available.

android_precise_5

After updating, run the commands below to include AndroidSDK in your path environment.
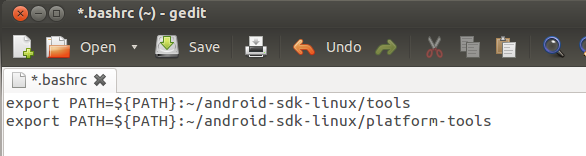
gedit ~/.bashrc

Then add these lines at the very top of the file and save it.
export PATH=${PATH}:~/android-sdk-linux/tools
export PATH=${PATH}:~/android-sdk-linux/platform-tools

android_precise_6


Log out and log back in, then type android on the command line to launch the software.
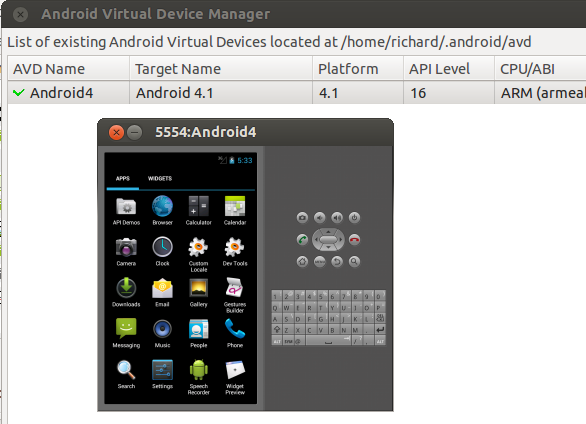
android avd

Build your own phone.

android_precise_7

Tuesday, June 25, 2013

SHORTCUT FOR OPENING THE SYSTEM MONITOR IN UBUNTU

It’s pretty easy to get the familiar key combo Ctrl+Alt+Del to open the System Monitor in Ubuntu, like what you’d be used to in a version or two of Windows. And it’s well worth doing, as it can come in really handy at times, especially if a crashing app is freezing the system, and the only way to stop it is to kill the process in the System Monitor.
But some people have had trouble getting this key combo to work, and others found it no longer worked after an upgrade. There is plenty mention online of it not working with Compiz-Fusion enabled, as it can usurp those key bindings, but I haven’t found this to be the case (even though I’ve been assured that Compiz-Fusion developers assert it shouldn’t work, and it’s strange that it does for me!).
Besides those poor souls who can’t get this combo to stick while desktop effects are on, invariably it seems a setting had been altered during an upgrade, preventing this combo from working as desired. So here’s what to do if you find yourself in this situation:
Go to System > Preferences > Keyboard Shortcuts, and under Action search for “Log out“. Under Shortcut you will see that Ctrl+Alt+Del is assigned to this action (though it probably doesn’t work); click on that shortcut and press Backspace if you want to disable it, or choose another combination (though I recommend disabling it).
Close it and open the Configuration Editor (found in Applications > System Tools). In the left pane navigate to apps > metacity > global_keybindings, and in the right-hand pane search for a “run_command_X” value under Name (where X is between 1 and 12 and it is not used – I just used run_command_1). Double-click its Value and add <Control><Alt>Delete.
Now select keybinding_commands in the left pane, and locate “command_X” (where X is the same number selected in run_command_X option, eg: command_1), and for its Valueenter gnome-system-monitorNote that, at least on my system, this value can be blank without affecting the keybinding, so if you choose you can leave it out and apply it if needed, though it shouldn’t hurt to do so while you’re in the Configuration Editor.
If you don’t have Configuration Editor, open a terminal and paste these two commands:
gconftool-2 -t str --set /apps/metacity/global_keybindings/run_command_9 '<Ctrl><Alt>Delete'
gconftool-2 -t str --set /apps/metacity/keybinding_commands/command_9 'gnome-system-monitor'
Ctrl+Alt+Delete should now open the System Monitor, and you will see your custom keybinding if you go back into Keyboard Shortcuts. If the key combo still doesn’t work, you’ll probably find there is no custom keybinding defined in Keyboard Shortcuts, but you can easily create a Custom Shortcut by clicking the Add button; to define the key combo, click in the Shortcut field (it should say Disabled) and press the actual key combination to record it.

Monday, June 24, 2013

DEADLOCK

We say that a set of processes or threads is deadlocked when each thread is waiting for an event that only another process in the set can cause. Another way to illustrate a deadlock is to build a directed graph whose vertices are threads or processes and whose edges represent the "is-waiting-for" relation. If this graph contains a cycle, the system is deadlocked. Unless the system is designed to recover from deadlocks, a deadlock causes the program or system to hang.

Synchronization deadlocks in Java programs

Deadlocks can occur in Java because the synchronized keyword causes the executing thread to block while waiting for the lock, or monitor, associated with the specified object. Since the thread might already hold locks associated with other objects, two threads could each be waiting for the other to release a lock; in such a case, they will end up waiting forever. The following example shows a set of methods that have the potential for deadlock. Both methods acquire locks on two lock objects, cacheLock and tableLock, before they proceed. In this example, the objects acting as locks are global (static) variables, a common technique for simplifying application-locking behavior by performing locking at a coarser level of granularity:

An example for a deadlock

 public static Object cacheLock = new Object();
  public static Object tableLock = new Object();
  ...
  public void oneMethod() {
    synchronized (cacheLock) {
      synchronized (tableLock) { 
        doSomething();
      }
    }
  }
  public void anotherMethod() {
    synchronized (tableLock) {
      synchronized (cacheLock) { 
        doSomethingElse();
      }
    }
  }

Now, imagine that thread A calls oneMethod() while thread B simultaneously calls anotherMethod(). Imagine further that thread A acquires the lock on cacheLock, and, at the same time, thread B acquires the lock on tableLock. Now the threads are deadlocked: neither thread will give up its lock until it acquires the other lock, but neither will be able to acquire the other lock until the other thread gives it up. When a Java program deadlocks, the deadlocking threads simply wait forever. While other threads might continue running, you will eventually have to kill the program, restart it, and hope that it doesn't deadlock again.