
In this document you are going to see how you can setup pseudo-distributed, single-node Hadoop (any stable version 1.0.X) cluster backed by the Hadoop Distributed File System, running on windows. Run your Hadoop cluster through 10 steps
Pre-requisite
Software’s
to be downloaded before you start these procedures. You can download
all the recommended software’s before you get started with the steps
listed below
- Cygwin download for windows
- Oracle Java – Java 1.6 (aka Java 6) is recommended download windows executable (.exe) either x64 is 64 bit platform or x86 for 32bit platform
- Hadoop 1.0.4 ( direct link), Oct 2012 stable release
Single-node Hadoop cluster step by step instruction
1. Installing Cygwin
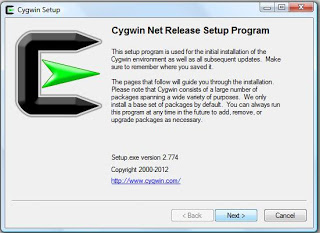
a) Cygwin comes with a normal setup.exe to install in Windows, but there are a few steps you need to pay attention, I would like to walk you through the step by step installation. Click her to download Cygwin setup
b)Once you start installing the first screen which appears this
a) Cygwin comes with a normal setup.exe to install in Windows, but there are a few steps you need to pay attention, I would like to walk you through the step by step installation. Click her to download Cygwin setup
b)Once you start installing the first screen which appears this
SSH Installation
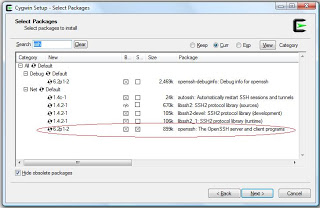
c) After 4 steps from the above screen you will be getting a screen to select packages, in this step you can choose OpenSSH installation along with Cygwin
c) After 4 steps from the above screen you will be getting a screen to select packages, in this step you can choose OpenSSH installation along with Cygwin
d) Cygwin installer proceeds with including all dependent packages which are required for the installation.
Now you installed Cygwin with OpenSSH2. Set Environment Variable in Window
a) Find “My Computer” icon either on the desktop, right-click on it and select Properties item from the menu.
b) When you see the Properties dialog box, click on the Environment Variables button which you see under the Advance Tab.
c) When you click Environment Variables dialog shows up, click on the Path variable located in the System Variables box and then click the Edit button.
d) Edit dialog appears append you cygwin path end of the Variable value field
(I installed Cygwin under C: drive – c:\cygwin\bin;)
Now you are down with Cygwin environmental setup
3. Setup SSH daemona) Open the Cygwin command prompt.
b) Execute the following command:
$ ssh-host-configb) Execute the following command:
c) When asked if privilege separation should be used, answer no.
d) When asked if sshd should be installed as a service, answer yes.
(If it prompts with CYGWIN environment variable, enter ntsec)
4. Start SSH daemon
a) Find My Computer icon either on your desktop, right-click on it and select Manage from the context menu.
b) Open Services and Applications in the left-hand panel then select the Servicesitem.
c) Find the CYGWIN sshd item in the main section and right-click on it.
d) On the property popup you can select “Start up :” Automatic. So that it will start up when windows starts
5. Setup authorization keys
a) Open Cygwin Terminal and exectute the command
$ ssh-keygen
(Since we are generating keys without password, so press enter. Below is the sequence of text which appears in the terminal prompt)
b) Once the command completed generating the key
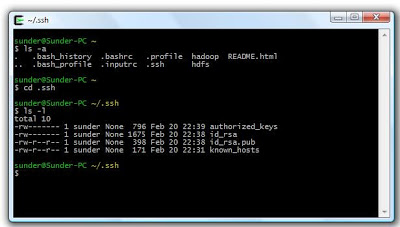
$ cd ~/.ssh
(.ssh
folder will be under $ <user> directory, eg:- please find he
screen shot below .ssh is under my user profile installed in my system
is “sunder”)
c) Next
step is to create an RSA key pair with an empty password. You have to
enable SSH access to your local machine with this newly created key.
$ cat id_rsa.pub >> authorized_keys
Now you created RSA key pair
To test SSH installed, from a terminal prompt enter:
$ ssh localhost
( You will get a similar notification in the terminal)
|
$ ssh localhost
|
|
|
2
|
Last login: Mon Apr 8 21:36:45 2013 from shankar-pc
|
Now you SSH successfully running with keys generated
6. JAVA Installation
a) Installing JAVA in windows system is a easy step up step process
b) You can download .exe for Windows installation file from the Oracle JDK download page
c) Choose your JAVA installation folder (eg :- C:\Java\jdk1.6.0_41) and install JAVA
Now you successfully installed JAVA
7. Setting JAVA_HOME in Windows
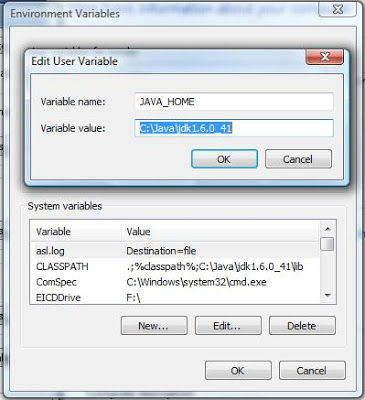
a) Set environmental variable for JAVA_HOME, as we already did for Cygwin in the above instruction – the same steps to be followed for setting JAVA_HOME
b) You may need to create a new variable under the User Variable / System Variable. Please find the reference screen shot below
8. Setting JAVA_HOME in Cygwin
a. To set JAVA_HOME in Cgwin have to update Java home directory in /etc/bash.bashrc
b. edit $HOME/.bashrc file to set JAVA home directory
$ vi bashrc
c. Set
Java home, you can see export JAVA_HOME line in the file been commented
using #. Remove # (uncomment it) and you have to key in by giving
your Java installed path
d. export JAVA_HOME= c:\\java\\jdk1.6.0_41
(to recognize your windows folder you have give 2 backward slash”\\” for each folder, since I installed java under c:\java\jdk1.6.0_41 in my windows path)
Please Note:
Since you are using Windows you can also edit file through windows explorer whenever you are editing any files inside Cgwin through Windows either with notepad or wordpad, after saving the files in windows ensure you get into Cgywinterminal and locate the file and execute a UNIX command “$ dos2unix <filename>”. This is more important in all stages of execution
e. Exit any terminal and open a new terminal
f. To check the variable is set, type the command in a terminal
$ echo $JAVA_HOME
(The
above command will display the java directory path you se or you can
also type $ java –version or simply $ java to see execution of java
commands in the terminal )
Now you set environment variable in Cygwin ie. JAVA_HOME
9. Hadoop Installation
Below step by step instruction will help you to setup a single-node Hadoop cluster. Before we move on know about the HDFS (Hadoop Distributed File System) Architecture Guide
a) Download a recent stable release from one of the Apache Download Mirrors.
b) Download “hadoop-<version>.tar.gz” to your desired directory
c) From the terminal type this command where you download your hadoop-< version>.tar.gz file
$ tar -xvf hadoop-<version>.tar.gz
d) The above command will extract the hadoop files and folder
e) Once you extracted all the files, you may have to edit few configuration files inside <Hadoop Home> directory
Feel
free to edit any file through windows with wordpad but don’t forget to
execute the UNIX command “$ dos2unix <filename>” for all the files
you open up in windows.
f) Now edit <Hadoop Home>/conf/hadoop-env.sh to set Java home as you did it before for environmental variable setup
(Since I already set my JAVA_HOME in .bashrc so I gave JAVA_HOME=$JAVA_HOME)
g) And then update <Hadoop Home>/conf/core-site.xml. with the below xml tag to setup hadoop file system property
<configuration>
<property>
<name>fs.default.name</name>
<value>hdfs://localhost:50000</value>
</property>
</configuration>
h) Now update<Hadoop Home>/conf/ mapred -site.xml with the below xml tag
<configuration>
<property>
<name>mapred.job.tracker</name>
<value>localhost:50001</value>
</property>
</configuration>
i) Now update<Hadoop Home>/conf/ hdfs -site.xml with the below xml tag
<configuration>
<property>
<name>dfs.data.dir</name>
<value>/home/<user>/hadoop-dir/datadir</value>
</property>
<property>
<name>dfs.name.dir</name>
<value>/home/<user>/hadoop-dir/namedir</value>
</property>
</configuration>
Assume
you created your directory in your user profile, so user your user name
after /home otherwise you can also check your folder by executing pwd command after you get into your terminal inside your created folder
Assuming
create “data” and “name” directory from your home directory, I created a
directory hadoop-dir and inside that I have created 2 directories one
for name node and other for data node
ensure your data and name directory created and accessed by hadoop, execute the command to change the directory permission by
$ chmod 755 data
as well as
i.e. if you $ ls -l your
directory you data and name directory should be in this mode
“drwxr-xr-x” which means owner has three permissions, and group and
other have only read and execute permissions
10. HDFS Format
Before starting your cluster you may need to format your HDFS by running the below command from <Hadoop-Home-Dir>/bin
$ ./hadoop namenode -format
11. Copy File to HDFS
To copy local file to HDFS execute this command from <Hadoop-Home-Dir>/bin from the terminal
$ ./hadoop dfs -copyFromLocal <localsrc> URI
Eg: – If I have a sample.txt file in the path /home/<user>/Example
Then I have to executing the command from<Hadoop-Home-Dir>/bin
$ ./hadoop dfs –copyFromLocal /home/<user>/Example/sample.txt /
This command will copy the local fin into HDFS home directory
12. Browse HDFS through web interface
Starting hadoop cluster is by executing a command from <Hadoop-Home-Dir>/bin
$ ./start-all.sh
This will startup a Namenode, Datanode, Jobtracker and a Tasktracker on your machine
To stop the cluster
$ ./stop-all.sh
to stop all the daemons running on your machine.
To understand more on Getting Started With Hadoop
Browse the web interface for the NameNode and the JobTracker; by default they are available at:
NameNode – http://localhost:50070/
JobTracker – http://localhost:50030/


No comments:
Post a Comment